Tuesday, March 24, 2015

Chocolate Cranberry Rye


One of our gals in the kitchen kept talking about a chocolate rye they made in another bakery she worked. Every week she was bringing up this bread until it sunk like an earworm into my brain (Thanks, Sonia, Thanks A LOT). Finally, when Sharon bread goddess went on vacation and I covered some baking shifts I got my chance to exercise that little bugger out of there. It was a good thing too, cause this is the best bread ever!

Chocolate Cranberry Rye
yield 3- 1 1/4 pound loaves


1 1/2 teaspoon (1pkg) Active Dry Yeast
2 cups (1#) Active Sourdough Starter
2 cups Warm Water
2 1/4 cup (10 oz) Dark Rye Flour


Mix above together in a large bowl. Cover and let sit 2 hours.


Stir in:
2 Tablespoons Brown Sugar
1/4 cup Stout Beer
1/2 cup Cocoa Powder
3 cups (14 oz) Bread Flour
1 tablespoon soft butter - unsalted
1 1/2 teaspoon salt


Stir until well combined, cover with a clean cloth and let sit for 20 minutes.
Turn out onto floured board and knead until smooth. 5-10 minutes.
Cover again and let rise until doubled in bulk. 1-2 hours.
Punch down and carefully knead in 3/4 cup dried cranberries or cherries and 1/2 cup bittersweet chocolate chips. divide into 3 small or two large loaves and place on sheet pan lined with parchment paper or sprinkled with cornmeal. Cover and let rise 45 minutes or until a depression made with your finger in the side of a loaf does not readily bounce back.
Bake in a preheated 400 degree oven for 45 minutes or until internal temperature reads 200 degrees.

Tuesday, October 16, 2012

Easy Rustic Style White Bread


One of my favorite memories from childhood at my grandparents house is that of bread baking day. The smell of hot bread wafting all through the house teased my nostrils, I could hardly wait for the loaves to come out of the oven. Grandma let them cool just enough to cut into thick slices then she would slather each slice with salty butter and homemade jam. My siblings and I sat on the back stoop with the butter melting and dripping through our fingers and down our arms. We could eat a whole loaf that way, so she made a point to make enough to save for lunches for the rest of the week. My grandmother kept a very set routine so she baked once a week, always on the same day. I think of her now when I punch down the dough, which is what she used to let me do. She was a sturdy farm women and watching her knead it into submission never ceased to amazed me...how could you do that so long without your arms falling off? After becoming a baker and owning a bakery, I have been ever grateful for the machines we have to help with that process. 
In the past few years I have been experimenting more with wetter doughs and after writing the ciabatta post for Michael Ruhlman's Blog which had me making like 5 different batches at home, I realized the same could be accomplished without the addition of the long starter. I use this method when I forget to bring bread home from work...which is surprisingly often. I like to bake this as a rustic loaf, but you could fit it into a loaf pan for more uniform slicing. You can also fiber it up by swapping in a cup of whole wheat flour to the mix or add a handful of cracked rye berries or even cheese or herbs or whatever. Think of it as a blank slate of deliciousness. With it's crispy crust and lacy interior, it also makes the most excellent toast!

For two approximately 1.5# loaves:

3 cups/ 24 oz/682 ml Warm Water
11/2 teaspoon/.25 oz/ 7 grams ACTIVE DRY Yeast (NOT instant, which you can use, but you won't get the same great interior texture)
1 1/2 teaspoon/ 3 oz/ 9 grams Sugar
2 Tablespoons/ 2.5 oz/ 10 ml Olive Oil
6 cups/ 1lb 14 oz / 853 grams Unbleached all purpose White flour
1 1/2 teaspoons/ 3 oz/ 9 grams Salt

In a large bowl dissolve the yeast and suger in the water, add the oil.
Mix in about 5 cups of the flour and let the mixture sit for 5-20 minutes.
Add the last bit of flour and the salt


Mix together until all the flour should be absorbed, it will look pretty rough. Don't be scared.


Cover and let sit 30 minutes. Fold dough in the bowl scraping the sides into the center as you turn the bowl. Cover and let sit another 30 minutes, Fold and rest 2 more times. 
By the last fold, it will be poofy and firmer, but still not like a dough you would actually knead. Turn it out onto a well floured surface.


 fold the sides into the center


And turn it over


Cut in half


Fold each half together into a rough loaf


place on a floured baking sheet or parchment paper
Preheat oven to 450-500 degrees
place a shallow pan of water in the oven 
(gas-right on the bottom, electric-top shelf)
Cover loaves and let rise 45 minutes
Dock lightly with fingers and bake 25 minutes or until loaves reach internal temp of 200 degrees F 


Cool well before slicing, or you could just rip it apart and eat still warm with butter and jam...be sure to hide a loaf for later!


Thursday, September 27, 2012

Chorizo Sausage Chili


Brighten up even the dreariest of days, this chili has enough kick to bring your tastebuds out of hiding without making you sweat.

Chorizo Sausage Chili

2 cups dried red or pinto beans- 
rinsed well and soaked overnight then simmered in water until soft and  drained
2 Tablespoons olive oil
1 medium onion, diced
2 stalks celery, diced
2 carrots, diced
1/2 pound of chorizo sausage
1 pound pork sausage
4 cloves garlic, minced
1/3cup green chilis, diced (one small can)
1 pint crushed tomatoes
3 Tablespoons Chili powder
1 T Coriander
1 T Cumin
Salt to taste
Heat an 8 quart soup pot over medium high heat add the oil and the onion, saute 2 minutes, then add the celery, carrots and garlic. Continue to cook until onion is soft and somewhat translucent. Add the Chorizo and the pork sausage and continue to cook, breaking up the meat with your spoon. Saute until the sausage is cooked, add the chili powder, cumin, coriander, salt and green chilis. Cook 2 more minutes until the smell of the spices fills your kitchen. Add the tomatoes and the beans and a little water as needed. Simmer until all flavors combine, at least 30 minutes as long as all day! (this would be great on low in your crock pot, when you get home your house will smell delicious!)
Serve with lots of shredded cheddar and sour cream. Add diced avocado if your feeling especially scandalous. A great dish for game day! 


Tuesday, January 31, 2012

Candy Cane Beets and Kumquats


It's that time of year. Everything outside is white or grey. There is not a whole lot of fresh beautiful
produce coming our way, so you have to be pretty creative with what you do get. Last week in our CSA box, my family got a bundle of candy cane beets. Their inside striped with red and white is so festive, it is sure to brighten even the most depressed winter soul. I wasn't sure how I wanted to cook them, so I took a trip to my favorite grocery store where I found some lovely kumquats and nice firm lemon grass. The perfect something sweet and bright to enhance the natural flavors of the beets. It's a fast and easy one too, perfect side dish for midweek ribs or pair it with a salad for a positively spa worthy dish!


To prepare you will need:
2 medium candy cane beets- washed, peeled and sliced into 1/8 inch slices
3 firm kumquats, washed and very thinly sliced, removing the seeds
1 medium orange- juiced
1" segment of fresh Lemon Grass finely minced
1/4 cup of dry white wine
2 pinches of kosher salt
1 tablespoon good quality olive oil
Heat Olive Oil in a 10" Saute pan over medium high heat. Add beets, kumquats and lemon grass and saute slightly...2 minutes. Add white wine to pan and cook for one minute to cook off alcohol. Add orange juice, sprinkle with salt and cover. Reduce heat to medium low and cook, covered for 15 minutes or until beets are fork tender and kumquats are translucent. Remove the lid and increase heat slightly. Cook 2 more minutes or until liquid is reduced and slightly thickened. Transfer to serving plate and garnish with arugula sprouts, or any green spicy thing you can get your hands on. Serve hot or at room temperature for a meal that is sure to make even your tired blood smile.


Monday, November 21, 2011

Purple Potato Parmesan: the perfect Thanksgiving side dish


If your looking for a holiday side dish that combines visual wow factor with do ahead ease that also happens to taste really great, this could be your forever secret weapon. 'Purple Potatoes' you say? They have been a staple of Alaskan home gardens as long as I've lived here, the first time you see one you can't believe your eyes and now they are 'cropping up' in grocery stores all over the place. All hail the proliferation of this lovely tuber! Now you don't have to use purple potatoes, red or yellow waxy potatoes work fine, too. They just won't look as pretty.


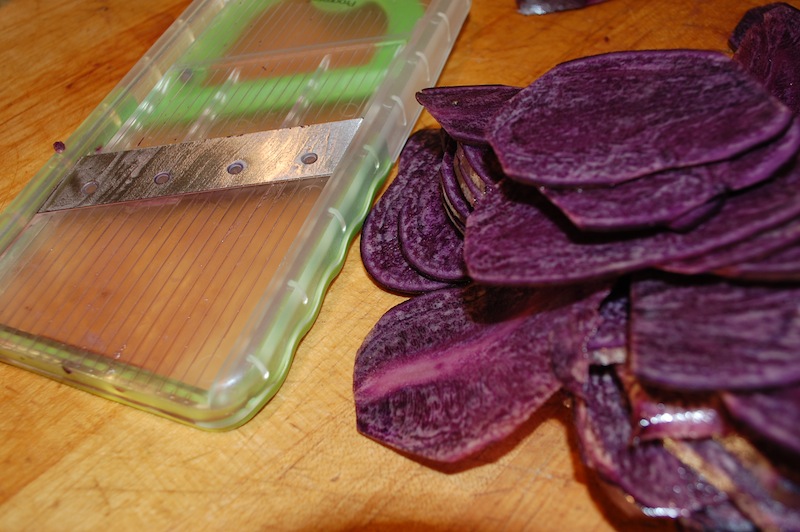
Start by washing and drying about 1 pound of potatoes. Using a pairing knife, cut off any eyes or blemishes. Slice the potatoes on the thinnest setting possible on your mandoline. It would be possible just very tedious to try to slice them with a knife.

Place potato slices in a bowl and pour over 1 cup of heavy cream. add a healthy sprinkle of salt and a dash of pepper and mix to coat.


Let that sit a minute while you grate your parmesan cheese: 


Grease a glass loaf pan and line it with parchment paper so that the paper comes up the sides of the pan. Place a thin layer of potatoes to cover the bottom of the baking dish then sprinkle with 1/3 of the cheese. Alternate this way until all potatoes and cheese are used up. 


Pour the cream left in the bowl over the layered potatoes. cover with another piece of parchment paper and place another loaf pan on top to weigh it down. 


Bake in a preheated 375 degree oven for 45 minutes to an hour, until potatoes are tender when poked carefully with a knife
Place on a sheet pan in oven to catch any drips.
Pull from oven and cool completely with the weight still in place. At this point it can be wrapped and stored in the refrigerator for up to 5 days. When ready to serve, run a knife around the edge to loosen and invert onto a sheet pan lined with parchment. peel off all the paper and cut into serving size slices. sprinkle a little more grated parmesan on top and bake in a 350 degree oven 15 to 20 minutes until sizzling hot and crispy on top. And then just try to keep your fingers off of it until dinner time!


Thursday, November 3, 2011

Crackers for McSweeney's


An afternoon off had me perusing my daughters bookshelf where I found another reason to love McSweeney's. Their quarterly review is a collection of stories presented in packaging as creative as the writing inside. Issue #16 is a beautiful cloth covered volume that opens into 4 pockets, one containing a volume of short stories. one is a slim novella (which is hilarious, by the way) the third is a story written on oversized playing cards which can be sorted any which way to make it a little different with each read. The fourth pocket contains a simple black comb engraved with the name Timothy. (Timothy McSweeney being the inspiration for the publishing house' name) I thought, as I looked through this 'book' That I had just met my soul mate in a publisher. These are obviously people who think outside the box! I was thinking outside the box this week, too. The cracker box, that is. Commercially made crackers always confound me. They are so expensive and then mostly disappointing once you do make the investment. So I decided to try my hand at some homemade cheesy crackers. I thought maybe I'd send some to McSweeney's to profess my undying love, but they were so good I ate them all. Too bad Timothy, maybe next time.
Cheesy Crackers outside the box:

In a food processor combine: 
8 tablespoons cold butter (1/4 #)
1 cup grated white cheddar cheese
1/4 cup sharp cheddar cheese, also grated
pulse until combined. 
Add:
2 cups all purpose flour
1/2 teaspoon salt 
pulse again until combined. 
Pull dough from processor and wrap tightly
Refrigerate for at least 30 minutes.
Roll out on a well floured board into a rectangle until very thin. 
To 1/16 inch or so. Prick the surface all over with a fork. (this is called 'docking')
brush over the surface with egg wash (one egg, a little water mix well), 
sprinkle with a little salt.
Cut into squares, I found my pizza cutter invaluable for this!
Then transfer to a baking sheet using a log metal spatula so you can pick up a whole row at a time.
Bake in a preheated oven 350 degrees for 10 minutes spin tray and bake 5-8 minutes more until golden.
Let cool completely before boxing them up...if there are any left, that is!


Tuesday, October 4, 2011

Pecan Cherry Granola...it's what's for breakfast.


Granola is one of those things that if your used to eating the pre-made version and then you try some homemade stuff, it is so much better that it's hard to go back to the package.  
We've been making granola at the bakery for quite some time. It has become so popular that folks were coming in to buy it by the pound. This summer, though, it was getting scarfed by breakfast customers so fast we couldn't sell it in bulk, which caused a bit of a ruckus, so I decided to post my personal recipe...my kids eat this up so quick, sometimes I have to make it twice a week!

Pecan Cherry Granola:
1/2 cup orange juice
1/4 cup olive oil (I like the fruity-ness of olive oil here, if it doesn't appeal to you, use canola or your favorite mildly flavored oil)
1/2 cup dark brown sugar
4 cups rolled oats (NOT the instant kind!)
1 cup flax seed
2 cups pecans, roughly chopped
1 1/2 cups dried cherries, roughly chopped

Preheat oven to 350 degrees. 
In a large mixing bowl, whisk together the orange juice, oil and brown sugar. 
Add the oats, flax and pecans. Stir together until oats, etc are well coated.
dump out onto a large baking pan lined with parchment paper (the paper, while not absolutely necessary, makes it super easy to transfer to a container and helps make clean up a breeze)
spread out into an even layer on your pan and bake in the middle of your oven for 15 minutes. Pull pan out and give the granola a good stir to ensure even browning. Bake for 15 more minutes, stir again and bake for another 15 minutes or until it has reached your desired toasty-ness. Pull from oven and sprinkle cherries on top and then stirring them in while the mixture is still warm. Let cool COMPLETELY, then transfer to an airtight container by picking up the two long ends of parchment to form a sort of funnel, put one end into your container and pour. Sealed tightly this will last for months, except at my house.

Please Note: This formula is merely a template...you can use any fruit or nut or seed or juice or oil you like. If you like it stickier, use a little more liquid and don't toast it quite so much. Think of it as your blank breakfast canvass. 


Sunday, March 27, 2011

Charles' Pot De Creme


While my latest obsessions have been of the savory variety, my son Charles has been hooked on custard.  He has had some painful mouth problems in his young life and soothing cold custard has been his favorite treat for as long as I can remember. It comforts like no other dessert and making it is a breeze. Now, that's not to say it didn't take a few batches before we got the formula quite right for the texture and flavor we wanted. Charles enjoys cooking projects and since he loves this dish so much, I decided it would be a great beginners recipe to write. I had him start with a basic flan custard, which was way too eggy for our tastes. With less egg it needed a little more fat. Swapping out some of the milk for heavy cream was just the ticket. It was a little sweet, so he reduced the sugar and also experimented with cook temps and times, finding low and slow is the way to go. One happy accident came from not having quite enough custard cups the first time he made it, so we rooted out a case of 1/2 pint wide mouth canning jars and used a couple those. The next day when Charles wanted to take one to school in his lunch, John just screwed on the cap (he is so smart!). Totally portable. He now makes the whole batch in those jars. For Charles this was a tasty and rewarding project, all in all he made this about 10 times to get it right, keeping good notes on the changes he made along the way and can now make the whole recipe without any help from me. It makes me happy because I know it is a gift that will keep on giving his whole life (won't his girlfriends be lucky).  

For the Custard:
In a blender pour 
1/12 cups heavy cream
2 cups whole milk
1/4 cup sugar
1  14 ounce can sweetened condensed milk
5 large eggs
1 teaspoon pure vanilla

Blend on medium speed until thoroughly mixed. Pour though a sieve into a large pitcher to strain. Then pour into 8 custard cups, or in our case wide mouth 1/2 pint canning jars. put jars into a 9 x 13 baking pan and fill the pan half up the side of the jars with warm water. Bake in a 300 degree oven for one hour and ten minutes. Ours get a little brown crust on top, which we like, but if you want them white on top, cover with foil while baking and reduce bake time by 10 minutes. They will still jiggle a tad but should not be liquidy in the center. Be careful pulling from oven. Set out to cool before removing them from the water. Once they are room temp refrigerate for four hours or so until completely chilled. Then all you need is a spoon...isn't that right, Chaz?


Tuesday, March 22, 2011

Pho Chay


Pho Chay

In my winter haze I began fantasizing about travel to somewhere warm and cheap. Since actual travel was not in my budget, I satisfied my need by reading and cooking. I had heard of pho before, but for some reason this year it has gotten more press than ever. Maybe it's because of the clean, cleansing broth, or the slippery noodles and crunchy condiments that make you slurp and chew at the same time. Whatever it is, the pure satisfaction of this dish has had me in a trance all winter long. I found in my research that Pho is generally made with beef, Pho Bo. I knew that if I wanted to serve it as a regular dish on the bakery dinner menu, I would have to come up with a version that could be served as both a beef or a vegetarian dish. It may not be the classic, but it is delicious.

For the broth you will need:
4 ounces dried mushroom blend (preferably one that has shiitakes in it)
2 medium red onions skin on and whole
a fist sized knob of ginger
2 cinnamon sticks
1 tablespoon whole clove
1tablespoon whole coriander
1 tablespoon fennel seed 
3 whole star anise
2 tablespoons fish sauce
2 tablespoons turbinado sugar ( or a half dollar sized hunk of palm sugar, if you can find it)
salt to taste

To finish the soup:
1 package rice noodles, the thinner ones
chopped cilantro
chopped fresh basil
fresh mung bean sprouts
scallions thinly sliced in the bias
crimini mushrooms very thinly sliced
Lime wedges
Sambal Olek

To make broth:

soak dried mushroom blend in 4 cups water overnight in the refrigerator

Preheat oven to 350 degrees
Drain mushrooms reserving the liquid. Pat dry and toss with olive oil and salt. Spread mushrooms out onto a sheet pan lined with parchment and roast in oven for about 15 minutes until golden and even slightly crispy. 
While Mushrooms are roasting cut 2 red onion in half lengthwise and place on another sheet pan lined with parchment. Place whole knobs of ginger on same pan and roast them in the same oven
with the mushrooms. once the onions are caramelized and the ginger is soft, slide the onions into a large stock pot, chop the ginger into big chunks and put it in the pot along with HALF of the roasted mushrooms. Pour in 10 cups of water and bring to a slow simmer. As it's coming to temp, dry roast your spices in a clean dry saute pan and add them to the pot. Add salt and sugar and fish sauce. Let simmer gently for at least 1 1/2-2 hours. Strain broth and keep very hot until ready to serve, checking the spice and adjusting as needed. (or if your doing it ahead chill and store for up to one week)

Bring 6 quarts of water to a boil in a large pot and add rice noodles cook, stirring frequently. boil until just tender then drain and toss with a tablespoon of vegetable oil to keep from sticking together. Set aside until ready to assemble.

To serve:
Put noodles in bottom of bowl. Sprinkle on some of the roasted mushrooms and some of the sliced fresh mushrooms. Ladle hot broth over this and serve at table with the condiments on the side, so people can put on what they like. Serve with a nice refreshing bottle of 'Red Saigon' (over ice, the way they do it down there!) and you'll feel like you've had a little trip to Vietnam, sans the jet lag. 


Sunday, February 27, 2011

Spagetti Carbonara


This was one of the more popular dishes from the recent fundraising dinner we did for the Homer High Ski Team (competing at the State competition this weekend up in Fairbanks....Go Mariners!)
My first exposure to Spagetti Carbonara was at an italian restaurant in Colorado Springs where, as a young Carri, I learned to hone my skills in working with chefs who are jerks. And also where I learned about how a dish can get so far away from it's roots. The one they served was a cream laden mess with green peas and thick sauce. Carbonara is not an old country italian dish, necessarily speaking, though any noodle eating culture has some version in their traditions. This one originated in Rome, where I hear they really love their pasta, and is specifically called carbonara (rooted in the italian word for charcoal) for the coal miners who labored in midcentury italy (perhaps it was their favorite?). It was brought to the states by the soldiers of WWII who's european rations were made up of powdered eggs, bacon, pasta...add some local cheese and there you go. This is a simple dish, prepared fairly quickly and must also be eaten right away, before the cheese cools. It is a great pasta course for an elegant dinner, just a few bites of silky fabulousness to get the mouth ready for the entree to come. At least that's what I was thinking when I planned that dinner. I used my home cured pancetta (thanks again Mr. Ruhlman) and eggs from my friend Samantha's chickens to make it extra special. 
There are many versions of this dish out there besides my old chef nemesis' heart attack on a plate.
Many people just fry the bacon and toss in the eggs and the cheese, which is just dandy, especially if you have great bacon. I like to add a little extra flavor by adding in carmelized shallots. they completely disappear in texture but the flavor adds a little something...the white wine doesn't hurt, either.  
Here's my version of Spagetti Carbonara for two.
You will need:
12 ounces (3/4 #) dried spagetti or angel hair (really anything would work, for gluten free, I like quinoa pasta)
1/4 pound pancetta or bacon, sliced into thin chunks
1 large shallot diced (about 1 cup)
1/2 cup dry white wine 
2 eggs
2/3 cup (at least) pecorino romano cheese, freshly grated
plus extra for sprinkling on top. 
1/2 cup chopped flat leaf parsley

To assemble:
Start an 8 quart pot of water to boil and throw in a handful of salt. It is important to salt the pasta water, because this seasons the pasta as it softens in the boiling water. While the water is heating, fry the bacon in a large skillet until it is crisp. As bacon is frying, your water should come to a boil, add the pasta and stir frequently. Pull bacon pieces out of frying pan and let drain on a little paper towel. if you have a lot of fat left in the pan, pour some off (not down the drain, either. in the trash or, better yet in a container to use for later!) leaving about 2 Tablespoons in which to fry your shallots. Put shallots in pan and saute over medium heat until they are very tender and browned. Add white wine and cook until liquid is almost gone. At this point the shallots will be completely decimated. (word for the day, means to reduce drastically, among other things) Your pasta should be cooked to just soft, with a bit if 'tooth' still left in the center. Once it is done, drain, reserving about a cup of the cooking water. Whisk together the two eggs in a bowl and add in the cheese. whisk in about 1/2 of the reserved hot pasta water. Place the drained noodles into the hot pan with shallot reduction turn off the heat and pour over the egg mixture (the heat from the freshly cooked pasta will cook the egg), toss on 1/2 of the cooked bacon and mix the whole mess using a pair of tongs or a big fork. If you must, switch to a larger pan or go right to your serving dish. If it's too thick add the remaining pasta water, sprinkle on the chopped parsley and finish with the rest of the bacon and more cheese on top. A little arugula salad (the bitterness of the greens really balance out the slightly sweet, fatty bacon) on the side makes this a nice dinner for two...okay, my husband would say add a grilled steak to that, but, hey...the bacon is enough for me. To each his own, right? 


Thursday, January 20, 2011

Rockfish Crudo

so simple and delicious!

We get beautiful fish here in Homer. And while we are the self titled "Halibut Capital of the World", Halibut isn't the only thing we have in relative abundance, in fact, it is in such high demand, fetching prices of up to $6.00 a pound across the dock, my husband won't be bringing any home for our freezer.  He will, however, bring home rockfish. It is a by-catch associated with halibut long lining, but does not have a strong market here. We are able to move some on the local buyers, but the rest comes to us. some we have commercially processed to use at the bakery and the rest goes right into our freezer. I love having this around for the last minute dinner. It thaws so fast, you could have a solid block of frozen fish and come home, pull it out and immerse in cool water, take a hot shower and you'll be ready to cook it by the time your toweled off. We often use it as our ace in the hole when we have unexpected company. No matter how you cook it, this fish is always very good. One of my favorite ways to use this fish, especially when it's only been frozen for a short time, is to make a crudo. It's sort of like a ceviche, only the fish isn't left to cook in the lime quite as long. In fact my crudo spends a little more time with the lime juice than most, but I find the texture to be so great if the fish is, if you will, cooked in the acid until it is just 'al dente'. You can play with this yourself, depending on the comfort level of your guests...you could pile all kinds of wonderful things like shaved onion, avocado, tomato, yuzu, salmon roe...whatever turns you on. Me, I like to keep it simple, especially if there is a big menu to come. So amazing, so clean, so simple!
Here is how I do it:
If your fish is fresh, freeze it until solid. This will kill any parasites that may be lurking about and it will make it easier to slice super thin. Take your frozen fish and thaw it just slightly, it should feel a little pliable, but still be stiff in the center. With a sharp knife and going across the grain make paper thin slices of the fish. Place those slices in a single layer on a glass plate. Squeeze lime juice liberally over fish and sprinkle with a tiny pinch of sea salt. Cover with plastic and refrigerate up to 30 minutes. Right before serving, remove plastic and drizzle with olive oil and sprinkle with cilantro leaves. If your gilding the lily, add the above condiments, or whatever suits your fancy. Serve with a nice flat bread cracker or crack chips. OR, if your a purist, just a fork or a pair or chopsticks are all the accessory you need.


Wednesday, January 19, 2011

Nuts for Spiced Nuts!


When they told me theme for the high school ski team dinner was nuts for skiing, I knew I wanted to make some spiced nuts to put in bowls and nestle in amongst the pine bough decorations on the table. They snuggled right up next to the little skiers made out of nuts that one of the parents made. (Laura Miller, you rock...just sayin'!) Something a little sweet and spicy and crunchy all at the same time to get their taste buds revved up for the feast to come. These are also a favorite of mine to make for the holidays. They keep in a jar forever and can be packaged to give in gift baskets or passed around when unexpected guests arrive.
Here is what you need:
2 large egg whites
1 1/2 teaspoon kosher salt
3/4 cup sugar (I used organic)
2 teaspoons worchester sauce
2 teaspoons smoked paprika (regular will do, just won't be as flavorful)
1/2 teaspoon cayenne
5 cups nuts. I used pecans, cashews and walnuts
6 Tablespoons unsalted butter, melted and cooled
To make:
In a large bowl, using a whisk beat egg whites till frothy and light. Add salt, sugar, worchester sauce, paprika and cayenne and mix well. Stir in nuts and then melted butter. Turn out onto a parchment lined sheet pan and bake in a 325 degree preheated oven for 40 minutes, stirring every 10 minutes or so. Cool thoroughly before packaging, but not to be resisted if eaten when still slightly warm.

Wednesday, December 22, 2010

Coconut Macaroons- 2010 holiday cookie of the year.


Coconut Macaroons...not really a macaroon, per se, but people seem to know what we mean when we call them that, so there you go. These are so gooey and sweet and SIMPLE (and gluten free! YAY!), they are the perfect addition to your holiday cookie list. They are so popular this year we have had a hard time keeping them in the case!

1/2 cup sugar
4 cups sweetened coconut
3 egg whites- beaten lightly
2 Tablespoons melted butter
1/2 teaspoon almond flavoring
1/2 teaspoon vanilla extract
pinch salt

Beat egg whites while slowly pouring in the sugar. beat til just barely holding a peak when whisk is removed. Fold in remaining ingredients.
Drop spoonfuls onto a parchment lined cookie sheet. Use fingers dipped in water to neaten the shape.
Bake in 325 dgree oven for 10 minutes or until slightly browned.
cool well before moving. To totally guild the lily, drizzle melted chocolate in a fancy design on top.
Yield 24 to 36 cookies, depending on how big you make them.
Keeps in airtight container 1-2 weeks. perfect for mailing.

Thursday, November 25, 2010

Pumpkin Pie

Thanksgiving is here! All of my pies are made...40 of them to be exact. 5 different kinds. The most popular by far? That's right. 
Pumpkin

makes 2 - 8" pies
2 cups pureed cooked pumpkin, butternut squash works well too! (good to puree to remove any stringyness)
1 cup brown sugar
5 eggs
1 1/2 cups evaporated milk or heavy cream
1 t cinnamon
1/2 t clove
1 t ginger
1/4 t finely ground black pepper (optional)
Whisk all ingredients together, pour into two chilled unbaked pie shells and bake in preheated 350 degree oven
For 40 minutes until center jiggles only slightly when shaken.


Here is a crust recipe, too:

For 2 - 8" pies
2 1/2 cup unbleached flour
7 ounces cold butter, cut into little pieces
1 teaspoon salt
1 Tablespoon sugar
1/2 cup ice cold water
1 egg yolk
splash lemon juice
Cut cold butter into flour, working the mixture with your hands and rubbing between your fingers in a sheeting motion. When it is well combined add sugar and salt and mix together wet ingredients... Add to flour mix and work to form a ball of dough, using more flour or water as needed to keep it from being too dry or too sticky. Wrap tightly and refridgerate for an hour or up to a week. Will freeze for one month.

Thursday, November 18, 2010

Pistachio Thumbjams with raspberry filling

It's no denying the time for holiday baking is upon us...too soon you say? Never too soon around here, where we began making our little cookies a couple of weeks ago. We'll be in full swing with them by the end of next week. To get myself warmed up I decided to take on the Holiday Cookie Challenge put forth at ruhlman.com by Emilia Juocys. As we all try to get through this time with no Gourmet Magazine (thank goodness for my stack of back issues!) this will be a fun diversion. I thought long and hard about what I wanted to make and finally decided to use the bakery's very first holiday cookie recipe, pecan thumbjams, and give it a festive makeover. So here we have rolled the brown sugar dough in ground pistachios and used my homemade raspberry jam (perfect for it's bright red hue) to create one very merry cookie!

 
Pistachio Thumbjams with raspberry filling
yield 2 1/2 dozen 2" cookies
ingredients:
1 cup unsalted butter
1 cup brown sugar
2 large eggs
2 cups flour
1/2 teaspoon salt
1 tablespoon lemon zest
1 cup of ground pistachios*
1 cup of raspberry jam- seeded

Cream together the butter and sugar until light and fluffy. Add eggs and mix well. 
Add the flour, salt and lemon zest and mix until fully combined. Roll into 1 inch balls and roll each ball in the ground pistachios. place on a parchment paper-lined cookie sheet and press your thumb into the center to make a well for the jam. Spoon a bit of jam into the dent and bake at 325 degrees for 12 to 15 minutes, rotating the pan half way to ensure even browning. Cookies are done when edges are slightly browned. Let cool completely before eating...be carefull, the jam is HOT! These will keep for quite a while (4 weeks) in an airtight container, hidden away (this part is very important if you have a husband with a sweet tooth). Otherwise they are soo good, they won't last at all!

*the pistachios, I have to admit, were a little fussy. I could not find shelled nuts anywhere in my little town, so I shelled, then blanched, peeled, toasted, cooled and THEN ground them in a food processor. Good thing it is a holiday cookie, right?!

Monday, November 15, 2010

Soup of the day: Potato cheddar Beer

I wake up every morning and listen to the local public radio station to get the weather and local goings on. this morning as I drank my coffee and got my morning update, I could hear the wind and the sea raging outside my window. Winter is definitely here and the gale warnings the gal on the radio predicted for this morning are proving to be true as we watch the waves crashing on the beach behind the bakery. It's a good day for this soup, but then, it always is, gale or not.
The secret is in the beer:

Potato Cheddar Beer Soup
1 medium onion, chopped
4 ribs of celery, roughly chopped 
1 bottle of beer
6 medium potatoes (i use red, with the skins on, but any kind will work) roughly chopped
6 cups of water or vegetable stock
salt to taste
8 ounces cream cheese
3 cups cheddar cheese- shredded
In the bottom of your soup pot, with a little oil, saute the onion and celery until translucent, even a little carmelized. Add the beer scraping up the brown bits off the bottom of pan. Cook 2 minutes to burn off alcohol. Add the potatoes, water and salt. Cook over medium high heat until potatoes are soft. drop in cream cheese and let sit 10 minutes to soften. Blend with an immersion blender until very smooth. Whisk in the cheddar while it is still hot. Serve immediately. If needed, reheat verry carefully. Garnish with shredded cheddar and chopped scallions. If your feeling really spicy top with chopped jalapenos. 
Serve with fresh bread and butter and...you guessed it, a nice cold beer! 

Wednesday, October 20, 2010

Ginger Pickled Salmon

This is a great way to use frozen salmon and an awesome pantry item to have for the holidays. Quick and festive, what can be better?


When life gives you salmon...lots of salmon, you get pretty creative as to how to prepare it. This has turned into one of our favorites! We make for special catering events here at the bakery and at home we always try to have a jar in the fridge just in case we have to wow company on short notice. The appetizer we created by shredding it and putting it on cucumber rounds with wasabi and a cilantro blossom has become a crowd favorite...gets them every time!
To pickle 1 1/2 pounds of salmon (this is red salmon, but any kind works):
cut fish into little 2" strips about 1/2' wide...coat very thoroughly with kosher salt and place in a nonreactive container, covered in the refrigerator for at least overnight or up to 2 days (soak a little longer in clean water if it is salted more than 24 hours).
To make your pickling liquid:
in a medium saucepan stir together:
2 cups water
2 cups cider vinegar
1/2 pound fresh ginger- sliced thin
1 1/4 cup granulated sugar
1 1/2 T salt
1 1/2 T black peppercorns
2 t brown mustard seed (optional)
bring mixture to a boil, let cool and refrigerate overnight to chill completely.
Rinse salt from salmon letting the fish soak in cold water for a few minutes. drain well. put salmon into clean glass jars to two thirds full and top off the jars with the picking liquid. fit with a tight clean lid and refrigerate to cure for 3 days.
serve as shown above or just put it in a bowl and eat with your fingers like my 10 year old does...it's his favorite TV snack...such a good Alaskan boy!

Wednesday, October 6, 2010

King Salmon with honey cayenne glaze

 John went trolling for salmon today with his friend Harry. Harry is half of the wonderful couple that sold us the land on which the bakery now proudly calls home. He and his wife Shirley were very flexible and amazing when it came to doing the land deal, carrying the loan themselves at a time we were hard pressed to get credit from a bank. (The bank kept wanting to refinance my 10 year old car...they put more trust in the car than my business, which is window into the difficulties the super-small start-ups go through) We faithfully made our payments and saved our money, and eventually...thanks to the fact we had an asset that was tangible, we were able to design and build our dream bakery. We have worked hard to live up to the town's needs and expectations and we are grateful to all those who helped us along the way. Today, this one is for Harry and Shirley...Thank You! And Thanks for taking John out so he could bring home something that's a little rare this time of year. Fresh King Salmon. This particular fish is what's referred to as a 'feeder' king. King Salmon spawn after 5 years or so, until then they roam the oceans building up fat reserves for their harrowing journey upstream. Where we live, on a bluff about 500 feet above the shores of Cook Inlet, we have a very fine and expansive view of a particularly popular spot for these feeder kings and we watch all winter as, at times, a dozen boats or more are making the slow movements back and forth indicative of trolling. John came home with two fish, one a white king salmon (I sadly did not get a photo of before it was processed for the freezer). The other was a fine light pink gem, very fatty and beautiful pale color due to the cold temps and season.

To cook it, I decided to keep it simple and sear it skin side down and then finish it under a broiler with this super simple honey cayenne glaze. 
To make the glaze:
1/4 cup honey- any kind- go crazy!
a pinch of cayenne pepper 
stir it up in a little dish and set aside.
Heat up a cast iron skillet with a tablespoon or two of olive oil. place fish in when it's just smoking and sear the bottom not moving the fish at all...4 minutes. Glaze the fish once or twice while on the stove , putting another coating on right before moving pan to the broiler. Broil another four to 5 minutes. This was a thick filet, so I check it once and glaze it again before giving it two minutes more. Pull from oven and let sit to rest, covered for 3 minutes. Slather on the last of the glaze right before serving. 
We ate ours with crisp green salad and fresh ciabatta bread from the bakery...divine!

Wednesday, September 29, 2010

Midweek dinner...baby back ribs


I know most people don't associate wednesday nights as rib nights. Ribs are something you have on saturday when you have all day to tend the fire, right? Not so, I say! Need a quick prep, no fuss meal anytime...babybacks are your friend. An hour in the oven is all you really need. One hour of undisturbed alone time for you to take a long hot shower. Or as Ruhlman so gently put it in his roast chicken post, go have sex. I bet there's even time for a shower afterwards. Otherwise you can help the kids with their homework, have a glass of wine...whatever. One winter a few years back, I discovered the true beautiful simplicity of this method, which was introduced by my friend chef Ryan Lee. I had ordered 130 pounds of ribs for a cast party after the local holiday performances of the Nutcracker Ballet. My kids were in it along with half the town and the party, especially the ribs were a huge deal. Usually they are lovingly slow barbecued by our friend, Blake LaRue, but Blake's back went out the night before, leaving him completely unable to perform his 'cuing magic. I knew I could put them in the wood fired oven, but how to know they would be perfect? Ryan suggested I use his method that works for one rack or twenty, in a word, foolproof. We set them up in hotel pans with lots of aromatics in the bottom and baked them as directed. Sure enough, they were beautiful! It is now my go-to rib recipe, with it I have the secret to making a lot of people very happy in a relatively short period of time, and that..on a wednesday night, is priceless!

Here's how we 'do' it:

1 rack of baby back pork ribs (or twenty, if that be the case)
1 oven- preheated to 350 degrees
1 roaster pan, rack in place, with tight fitting lid or foil to cover

Turn ribs to the bone side and make sure the butcher has removed the silver skin. The bones should be clearly visible, but if they are covered by a light silver film, you'll want to remove it. This can be easily done by pulling up a section at the edge and working your fingers to separate enough that you can get a hold of the whole end, it should pull away in one piece, use a sharp boning knife to remove any fragments left behind. Rub your spice blend into the flesh, generously, on both sides. If you don't have a favorite rib rub, try this:
2 Tablespoons Kosher salt
1 Tablespoon coarsely ground black pepper
2 Teaspoons paprika (smoked would be great here, too)
2 Teaspoons ground thyme
1 Teaspoon red chili flakes
1 teaspoon granulated garlic
1 teaspoon sugar
mix all ingredients well and rub away.

lay rubbed ribs on rack in roaster pan 
throw some garlic cloves and chopped onion in the bottom and pour in about a cup of water.
Cover tightly and bake in preheated oven for one hour. This your chance to take a walk, call a friend, or 'you know what'. If you need a side dish, you could throw some scrubbed potatoes on the rack above the ribs.  Put some greens in a bowl for salad and then off with you!
After an hour pull pan out of the oven, let sit for 5 to 10 minutes to rest. This is a great time to mix up my favorite bbq sauce:
1 cup ketchup
1/2 cup dark brown sugar
2 Tablespoons balsamic vinegar, the best you have.
Stir until smooth.
If you want to char the ribs on the grill, now is good time, but if your natives are restless and ready to eat, just cut them in between each bone and throw the whole lot in a big bowl, spoon on 1/2 the sauce and toss, coating the ribs evenly. Spill out onto a platter with the extra sauce on the side and your done. Time to pour another glass of wine and sit back and enjoy the quiet, as everyone will be too busy eating to make any noise...ahhh, wednesday!