Wednesday, October 28, 2009

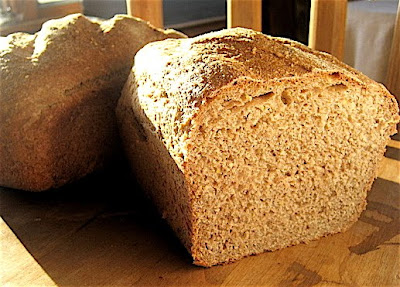
'No Knead' Multigrain Bread


As people are starting to make more healthful food choices, this has become one of our most popular breads. It is completely whole grain, with a soft texture and enough structure to hold up to the biggest sandwich. We make focaccia out of it for our roasted vegetable sandwiches and even turn it into cardamom sweet rolls.
To begin:
Soak 2/3 cup (.25 lbs) 10 grain cereal. (I'm using Bob's Red Mill)
in a large bowl with 4 cups warm water for 1 1/2 hours.
Add 1 and 1/2 T (2pkgs or 1/2 oz.) Active Dry Yeast and let sit 30 minutes more...
Stir in:
1/4 cup honey
1/4 cup canola oil
8 cups of Whole Wheat flour (2.25 lbs.)...one cup at a time, stirring well with each addition.
Before the last cup of flour add 1 more cup of water and 1 and 1/2 tablespoon salt.
Stir the mixture as though folding it into the center, spinning the bowl as you go.


Once it is pulled together, cover and let sit for 1 hour
Pull dough together in the bowl once again by running your spatula along the side of the bowl, pulling the dough into the center. cover and let rise 30 minutes more.

Turn out onto a well floured board and divide into 3rds. Briefly knead each portion into a ball. let sit 15 minutes.
pull rounds together into a loaf shape, being sure to get rid of the air bubbles and put into well oiled loaf pans. slash the tops and let rise 45 minutes or until a poke of your finger doesn't bounce back.


Spray the tops with water and sprinkle with a little of the dry cereal.
Bake for about 45 minutes in a 350 degree oven to an
interior temperature of 200 degrees.

Saturday, October 10, 2009

Bread and Butter Pickles...a memory of taste


For the first four years of my life I lived with my grandmother, along with my three older siblings. We were quite a handful, I'm told and my grandparents were old school... it was german farm life...washing on Monday, ironing on Tuesday, baking bread on Wednesday. Each season had it's own list of tasks, always preparing, planning or harvesting something or lots of things.As strict as they could be, we had dessert every night after dinner and I loved Thursday because it was chocolate pudding day. Grandma would make it in the afternoon and pour it into individual bowls and let it cool on the counter, where it would form the best skin. I know now that it's preferrable to cover your pudding to avoid the top drying out, but when I was a kid, it was my favorite part. The other absolute favorite thing my grandmother made every year was bread and butter pickles. They were always brought out at dinner, and had they allowed me to have more than 'just a little' I surely would've eaten a jar a night. We moved out of their house about the time I started school and whenever grandma visited she would bring me a fresh jar. It made the difficult transition somehow easier knowing I had something of her around always. (I know, they were just pickles...give me a break, I was five!)
Still, whenever I miss my grandmother, (who died 20 years ago!)... to conjure her up, I make a batch of her pickles.

Granny T's Bread and Butter Pickles

6 Qts or 15- 6" cukes, sliced thin
6 medium onions, sliced thin
1/2 cup pickling salt
mix these together thoroughly in a large glass bowl
Let sit 3 hours and then drain, but do not rinse
in a large stainless pot mix:
6 cups white vinegar
4 1/2 cup sugar
1/2 cup whole yellow mustard seed
1 teaspoon celery seed
Bring brine to a boil, add cukes and bring back to a low boil.
ladle into hot jars and process in a hot water bath 10 minutes
Yield about 8 pints

Monday, September 7, 2009

Raspberry JAM!


I'm not as much of a forager/preserver as I perhaps should be, especially living in a place with so much to offer the hunter-gatherer types. We have a freezer full of rockfish and that's about it...except for raspberry jam. It's a huge staple around here, both on toast in the morning and pb&j's for sack lunches. We need about 24 pints to make it through winter...and if you know anything about alaskan winters you'll completely understand why this is so important! This year was almost a bust in that department...normally we would have been picking mid-august, but it wasn't until a week ago that they finally started to pop. Of course the rain and stormy weather kept me from getting out on Wed. my day off...so, I was relieved to get a little break in the weather to get out today, and boy was it fun! My good friend Jane (owner of the best yard in Homer!) has the most amazing raspberry patch I have ever seen...and in the dozen years I've known her, the berries are always plentiful and her generosity at letting so many of us come to pick is the stuff of legend. The stalks are 6 feet high and the berries the size of my thumb (and then some!) all surrounding a lovely patch of grass looking over the bay with a cottonwood tree so big it has a buoy swing (the alaskan equivelent of a tire swing) hanging from it's branches. The kids run around and play while the grown-ups chat and pick furiously. I got so worked up talking about Sarah Palin I had three buckets full before I knew it! At least she's good for something,eh?
Enough politics...let's make jam!


First we put our clean jars in a big pan half filled with water, put the lid on and set it to boiling. The lids go into a smaller pan also half filled with water and also set to boiling.
Then we measured 4 cups of berries and 6 1/2 cups of sugar into our stainless pot and brought it to a rolling boil, stirring most of the time. (daughter Jane was mostly a big help at this) add 1 packet of liquid pectin and boil and stir for exactly one minute. turn off heat. using tongs, pull jars from hot water bath and fill to within 1/4 inch from the rim.
and again with the tongs pull the lids out of smaller pot placing them on the hot jars

and securing with the screw on metal rings.
I like to turn them over on a towel at this point until they cool completely when we will check the seals and store away in a cool dark spot.


We got our two cases done just in time to catch our good friend Tom Kizzia appear on CNN to help shed a little light on all this Sarah MADNESS!
Jam is done, back to politics!

Wednesday, August 19, 2009

Bread and Chocolate


This treat was born out of the stories we had heard of the favorite afterschool snack of children in France...Pan au Chocolat. There the bread is sliced warm and a little rod of chocolate is folded into it and handed to the lucky little one. Our version has it baked inside and topped with a little melted butter and cinnamon sugar. It has become a cult favorite here, with people ordering boxes at a time to take to family members from afar who just have to have their fix!
To begin:
Mix a batch of White Trash Dough let it rise in a warm place for an hour or so.
cut palm sized pieces using a bench scraper or knife...do not knead at this point just cut the squares and stretch them slightly:


Put a healthy handful of chocolate chips on each square,

and pull the edges up around the mound of chips

pinch togehter well and turn on to a parchment lined sheetpan with the seam on the bottom, brush with melted butter and sprinkle liberally with cinnamon sugar...while they rise, preheat the oven to 350 degrees.

Bake for 15 minutes and spin then 5-10 more minutes until nice and golden brown...let cool slightly before devouring!

Sunday, August 2, 2009

Flower Jelly


'Tis the season! I used the last of the lilac blossoms to try a batch of jelly...it was so fun to do, I made fireweed jelly, too.
Flower Jelly
for 5 - 8 ounce jars:
2 1/2 cups steeping medium, this can be pear juice (what I used) apple juice or white wine (or Champagne!)
2 cups fresh petals
4 cups Granulated Sugar
1/4 cup lemon juice
3 ounces of liquid Pectin
(to color my jellies, I used about 1/4 cup of red wine in the fireweed and just a little drop in the lilac, just for a bit of blush...I wish the true petal color came out in the steeping liquid, but it did not!)
Bring steeping liquid to scalding and add petals. Take off heat and stir. let cool to room temp. Strain.
Add 2 cups of above liquid to sugar and lemon and bring to boil in medium sauce pan over high heat. When sugar is completely dissolved and mixture has reached a rolling boil, add pectin. Return to boil for one minute.
Ladle into hot jars and put on sterilized lids.
Then revel in their awesomeness!

Saturday, July 18, 2009

'Starting' from scratch.

"If you truly want to make an apple pie from scratch, you must first create the universe." - Carl Sagan
And if want to create a starter from scratch, all you need is some warm water, flour and wild yeast. We get ours off of cabbage leaves. (Thank You, Jim Lahey!)


Take a large leaf and wash it off in 1 cups of warm water (really get in there with clean hands and rub the white film off the leaf) mix in 8 oz (a scant 2 cups) of flour, beat well and let sit covered on your counter, 12 hours.


 Feed again equal weights of flour and water and let sit again 12 hours. You should have a bubbly happy little mess on your hands. if not try feeding it and letting it sit one more night. There are a couple of key points to remember: All utensils, anything that touches your starter must be clean! Starter loves routine, so once your used to using it the same way on a regular basis is when it will be happiest. To keep if you use everyday, it can sit on the counter in a container. Feed and use the starter and clean out container when the sides get yucky. To use weekly from the refrigerator, pull from fridge and let come to room temp. Feed and let activate (8-10 hours) and use, keep a little out (about a cup) and give it a small amount of water and flour, return it to the fridge to chill for the week.


Now THAT is a happy starter!

Time to make bread:


To make a flavorful, slightly dense baguette:
Mix equal weights of water and starter and double that for the weight of flour. salt should be used sparingly but is necessary for a fully flavored loaf... try using 1% of the total dough weight. (i.e. 1#water + 1# starter + 2# flour = 4#  4x16= 64 ounces divided by .01= .64 or a little more than a half an ounce...about 2 teaspoons)
In a large mixing bowl, pour water and starter and stir to blend. add flour a little at a time until a ball of dough begins to form. Saving out about a cup of the flour. Cover the bowl and let this dough sit for 20 minutes. This is called an autolyse. The resting of the dough without the salt added to it allows for maximum absorption of the water into the flour and will make the gluten easier to form. When ready, sprinkle on the salt and about 1/2 of the remaining flour. Pull the dough into the center from the edges all the way around to incorporate the salt.  Dump out onto a well floured surface and knead together into ball. Set a timer and knead for 10 minutes. I know it can seem like a long time, but it is very meditative. put on some good music or that podcast of 'This American Life ' you've been wanting to listen to, time will be up before you know it AND you will have performed your arm workout for the day...bonus!  The dough will become quite silky and smooth, like a baby's bottom. Cover it and let it rest to rise. 1-2 hours, depending on your room temp, starter vigor, etc. If your doing this ahead, this would be the time to put into the  fridge, tightly covered. It can sit in there 12 hours or so. When ready to work, just pull it out, ring to room temp. and portion into loaves. knead into a football shape and let sit, covered for 20 minutes. Starting at the center of each loaf, roll with both hands (a little like when you used to make snakes out of clay) outward until your loaf is the length of your pan. Lay on parchment lined sheet pan to rise. Cover with a cloth if it is cool or drafty. Preheat oven to 450 degrees. if you have a baking stone line them up on the middle rack. Place a shallow pan half filled with water on the bottom of the oven (if your oven is electric, put the pan on top.) This is meant to create steam. Once the loaves have doubled in size (a finger poked in the side should leave a mark that does not bounce back) slash the tops with a razor or very sharp serrated knife place in the oven...on the pan if you don't have a stone. If you do have a stone, slide the loaves off the pan, parchment and all and right on to the stone. You may want to cut the paper so that each loaf is on it's own sheet for this to make for easier transport. Bake for approximately 20 minutes or until quite golden. Interior temperature should be 200 degrees.
Sunday, June 28, 2009

Get your Sticky Buns on...


Okay, so big aplogies to the gal looking for the sticky bun recipe the other day on the phone...truly, we are crazy busy, and had it been me you talked to, I might have been able to make it happen fast, but not for sure! I was able to make them at home today under normal kitchen circumstances and I think I've got it for you...
First mix a single batch of White Trash Dough and let it rise until double in bulk. In the meantime, oil a 9x13 pan and line with parchment paper. Now is a good time to make the Sticky Goo, as we so affectionately call it.
in a 3 quart saucepan melt 1/2 cup butter. pour off about 2 tablespoons into a glass bowl and set aside. To the butter in the pan add:
1 cup brown sugar
1/2 cup granulated sugar
1/2 cup Honey
1/4 cup heavy cream
1/4 teaspoon salt
Whisk together over medium heat until smooth. Pour into prepared baking pan

Sprinkle with 1 1/2 cups pecan halves...nows the time for a taste test!

Once ready, turn dough out onto a floured board...do not knead! just spread it out in all it's flattened glory. divide in half...knead together one half and put it into a loaf pan for sandwich bread or something...you won't need it for this. Take the other half and roll out on your floured board to a rectangle about 12"x 20". Brush with the reserved melted butter

Sprinkle on 1 cup of brown sugar and 1 tablespoon of cinnamon and roll it longways into a tidy log


Cut the log into 12 equal pieces and place cut side up in pan over the pecan mixture of love.

Let rise, covered in a warm place about one hour then bake in a preheated oven set at 350 degrees. it will take about 45 minutes. To be sure they are done, use an intstant read thermometer, they want to be 200 degrees inside!

Once you pull them from the oven...and this is important! Let them sit in the baking pan for 5 minutes or so to cool before dumping them out upside down onto a tray. This will allow the carmel to thicken slightly and it won't all just run off. You will be greatly rewarded for your patience!