Thursday, September 27, 2012

Chorizo Sausage Chili


Brighten up even the dreariest of days, this chili has enough kick to bring your tastebuds out of hiding without making you sweat.

Chorizo Sausage Chili

2 cups dried red or pinto beans- 
rinsed well and soaked overnight then simmered in water until soft and  drained
2 Tablespoons olive oil
1 medium onion, diced
2 stalks celery, diced
2 carrots, diced
1/2 pound of chorizo sausage
1 pound pork sausage
4 cloves garlic, minced
1/3cup green chilis, diced (one small can)
1 pint crushed tomatoes
3 Tablespoons Chili powder
1 T Coriander
1 T Cumin
Salt to taste
Heat an 8 quart soup pot over medium high heat add the oil and the onion, saute 2 minutes, then add the celery, carrots and garlic. Continue to cook until onion is soft and somewhat translucent. Add the Chorizo and the pork sausage and continue to cook, breaking up the meat with your spoon. Saute until the sausage is cooked, add the chili powder, cumin, coriander, salt and green chilis. Cook 2 more minutes until the smell of the spices fills your kitchen. Add the tomatoes and the beans and a little water as needed. Simmer until all flavors combine, at least 30 minutes as long as all day! (this would be great on low in your crock pot, when you get home your house will smell delicious!)
Serve with lots of shredded cheddar and sour cream. Add diced avocado if your feeling especially scandalous. A great dish for game day! 


Tuesday, January 31, 2012

Candy Cane Beets and Kumquats


It's that time of year. Everything outside is white or grey. There is not a whole lot of fresh beautiful
produce coming our way, so you have to be pretty creative with what you do get. Last week in our CSA box, my family got a bundle of candy cane beets. Their inside striped with red and white is so festive, it is sure to brighten even the most depressed winter soul. I wasn't sure how I wanted to cook them, so I took a trip to my favorite grocery store where I found some lovely kumquats and nice firm lemon grass. The perfect something sweet and bright to enhance the natural flavors of the beets. It's a fast and easy one too, perfect side dish for midweek ribs or pair it with a salad for a positively spa worthy dish!


To prepare you will need:
2 medium candy cane beets- washed, peeled and sliced into 1/8 inch slices
3 firm kumquats, washed and very thinly sliced, removing the seeds
1 medium orange- juiced
1" segment of fresh Lemon Grass finely minced
1/4 cup of dry white wine
2 pinches of kosher salt
1 tablespoon good quality olive oil
Heat Olive Oil in a 10" Saute pan over medium high heat. Add beets, kumquats and lemon grass and saute slightly...2 minutes. Add white wine to pan and cook for one minute to cook off alcohol. Add orange juice, sprinkle with salt and cover. Reduce heat to medium low and cook, covered for 15 minutes or until beets are fork tender and kumquats are translucent. Remove the lid and increase heat slightly. Cook 2 more minutes or until liquid is reduced and slightly thickened. Transfer to serving plate and garnish with arugula sprouts, or any green spicy thing you can get your hands on. Serve hot or at room temperature for a meal that is sure to make even your tired blood smile.


Monday, November 21, 2011

Purple Potato Parmesan: the perfect Thanksgiving side dish


If your looking for a holiday side dish that combines visual wow factor with do ahead ease that also happens to taste really great, this could be your forever secret weapon. 'Purple Potatoes' you say? They have been a staple of Alaskan home gardens as long as I've lived here, the first time you see one you can't believe your eyes and now they are 'cropping up' in grocery stores all over the place. All hail the proliferation of this lovely tuber! Now you don't have to use purple potatoes, red or yellow waxy potatoes work fine, too. They just won't look as pretty.


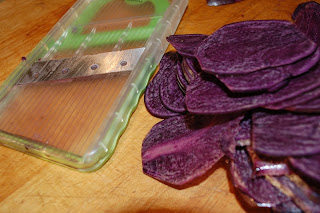
Start by washing and drying about 1 pound of potatoes. Using a pairing knife, cut off any eyes or blemishes. Slice the potatoes on the thinnest setting possible on your mandoline. It would be possible just very tedious to try to slice them with a knife.

Place potato slices in a bowl and pour over 1 cup of heavy cream. add a healthy sprinkle of salt and a dash of pepper and mix to coat.


Let that sit a minute while you grate your parmesan cheese: 


Grease a glass loaf pan and line it with parchment paper so that the paper comes up the sides of the pan. Place a thin layer of potatoes to cover the bottom of the baking dish then sprinkle with 1/3 of the cheese. Alternate this way until all potatoes and cheese are used up. 


Pour the cream left in the bowl over the layered potatoes. cover with another piece of parchment paper and place another loaf pan on top to weigh it down. 


Bake in a preheated 375 degree oven for 45 minutes to an hour, until potatoes are tender when poked carefully with a knife
Place on a sheet pan in oven to catch any drips.
Pull from oven and cool completely with the weight still in place. At this point it can be wrapped and stored in the refrigerator for up to 5 days. When ready to serve, run a knife around the edge to loosen and invert onto a sheet pan lined with parchment. peel off all the paper and cut into serving size slices. sprinkle a little more grated parmesan on top and bake in a 350 degree oven 15 to 20 minutes until sizzling hot and crispy on top. And then just try to keep your fingers off of it until dinner time!


Thursday, November 3, 2011

Crackers for McSweeney's


An afternoon off had me perusing my daughters bookshelf where I found another reason to love McSweeney's. Their quarterly review is a collection of stories presented in packaging as creative as the writing inside. Issue #16 is a beautiful cloth covered volume that opens into 4 pockets, one containing a volume of short stories. one is a slim novella (which is hilarious, by the way) the third is a story written on oversized playing cards which can be sorted any which way to make it a little different with each read. The fourth pocket contains a simple black comb engraved with the name Timothy. (Timothy McSweeney being the inspiration for the publishing house' name) I thought, as I looked through this 'book' That I had just met my soul mate in a publisher. These are obviously people who think outside the box! I was thinking outside the box this week, too. The cracker box, that is. Commercially made crackers always confound me. They are so expensive and then mostly disappointing once you do make the investment. So I decided to try my hand at some homemade cheesy crackers. I thought maybe I'd send some to McSweeney's to profess my undying love, but they were so good I ate them all. Too bad Timothy, maybe next time.
Cheesy Crackers outside the box:

In a food processor combine: 
8 tablespoons cold butter (1/4 #)
1 cup grated white cheddar cheese
1/4 cup sharp cheddar cheese, also grated
pulse until combined. 
Add:
2 cups all purpose flour
1/2 teaspoon salt 
pulse again until combined. 
Pull dough from processor and wrap tightly
Refrigerate for at least 30 minutes.
Roll out on a well floured board into a rectangle until very thin. 
To 1/16 inch or so. Prick the surface all over with a fork. (this is called 'docking')
brush over the surface with egg wash (one egg, a little water mix well), 
sprinkle with a little salt.
Cut into squares, I found my pizza cutter invaluable for this!
Then transfer to a baking sheet using a log metal spatula so you can pick up a whole row at a time.
Bake in a preheated oven 350 degrees for 10 minutes spin tray and bake 5-8 minutes more until golden.
Let cool completely before boxing them up...if there are any left, that is!


Tuesday, October 4, 2011

Pecan Cherry Granola...it's what's for breakfast.


Granola is one of those things that if your used to eating the pre-made version and then you try some homemade stuff, it is so much better that it's hard to go back to the package.  
We've been making granola at the bakery for quite some time. It has become so popular that folks were coming in to buy it by the pound. This summer, though, it was getting scarfed by breakfast customers so fast we couldn't sell it in bulk, which caused a bit of a ruckus, so I decided to post my personal recipe...my kids eat this up so quick, sometimes I have to make it twice a week!

Pecan Cherry Granola:
1/2 cup orange juice
1/4 cup olive oil (I like the fruity-ness of olive oil here, if it doesn't appeal to you, use canola or your favorite mildly flavored oil)
1/2 cup dark brown sugar
4 cups rolled oats (NOT the instant kind!)
1 cup flax seed
2 cups pecans, roughly chopped
1 1/2 cups dried cherries, roughly chopped

Preheat oven to 350 degrees. 
In a large mixing bowl, whisk together the orange juice, oil and brown sugar. 
Add the oats, flax and pecans. Stir together until oats, etc are well coated.
dump out onto a large baking pan lined with parchment paper (the paper, while not absolutely necessary, makes it super easy to transfer to a container and helps make clean up a breeze)
spread out into an even layer on your pan and bake in the middle of your oven for 15 minutes. Pull pan out and give the granola a good stir to ensure even browning. Bake for 15 more minutes, stir again and bake for another 15 minutes or until it has reached your desired toasty-ness. Pull from oven and sprinkle cherries on top and then stirring them in while the mixture is still warm. Let cool COMPLETELY, then transfer to an airtight container by picking up the two long ends of parchment to form a sort of funnel, put one end into your container and pour. Sealed tightly this will last for months, except at my house.

Please Note: This formula is merely a template...you can use any fruit or nut or seed or juice or oil you like. If you like it stickier, use a little more liquid and don't toast it quite so much. Think of it as your blank breakfast canvass. 


Sunday, March 27, 2011

Charles' Pot De Creme


While my latest obsessions have been of the savory variety, my son Charles has been hooked on custard.  He has had some painful mouth problems in his young life and soothing cold custard has been his favorite treat for as long as I can remember. It comforts like no other dessert and making it is a breeze. Now, that's not to say it didn't take a few batches before we got the formula quite right for the texture and flavor we wanted. Charles enjoys cooking projects and since he loves this dish so much, I decided it would be a great beginners recipe to write. I had him start with a basic flan custard, which was way too eggy for our tastes. With less egg it needed a little more fat. Swapping out some of the milk for heavy cream was just the ticket. It was a little sweet, so he reduced the sugar and also experimented with cook temps and times, finding low and slow is the way to go. One happy accident came from not having quite enough custard cups the first time he made it, so we rooted out a case of 1/2 pint wide mouth canning jars and used a couple those. The next day when Charles wanted to take one to school in his lunch, John just screwed on the cap (he is so smart!). Totally portable. He now makes the whole batch in those jars. For Charles this was a tasty and rewarding project, all in all he made this about 10 times to get it right, keeping good notes on the changes he made along the way and can now make the whole recipe without any help from me. It makes me happy because I know it is a gift that will keep on giving his whole life (won't his girlfriends be lucky).  

For the Custard:
In a blender pour 
1/12 cups heavy cream
2 cups whole milk
1/4 cup sugar
1  14 ounce can sweetened condensed milk
5 large eggs
1 teaspoon pure vanilla

Blend on medium speed until thoroughly mixed. Pour though a sieve into a large pitcher to strain. Then pour into 8 custard cups, or in our case wide mouth 1/2 pint canning jars. put jars into a 9 x 13 baking pan and fill the pan half up the side of the jars with warm water. Bake in a 300 degree oven for one hour and ten minutes. Ours get a little brown crust on top, which we like, but if you want them white on top, cover with foil while baking and reduce bake time by 10 minutes. They will still jiggle a tad but should not be liquidy in the center. Be careful pulling from oven. Set out to cool before removing them from the water. Once they are room temp refrigerate for four hours or so until completely chilled. Then all you need is a spoon...isn't that right, Chaz?


Tuesday, March 22, 2011

Pho Chay


Pho Chay

In my winter haze I began fantasizing about travel to somewhere warm and cheap. Since actual travel was not in my budget, I satisfied my need by reading and cooking. I had heard of pho before, but for some reason this year it has gotten more press than ever. Maybe it's because of the clean, cleansing broth, or the slippery noodles and crunchy condiments that make you slurp and chew at the same time. Whatever it is, the pure satisfaction of this dish has had me in a trance all winter long. I found in my research that Pho is generally made with beef, Pho Bo. I knew that if I wanted to serve it as a regular dish on the bakery dinner menu, I would have to come up with a version that could be served as both a beef or a vegetarian dish. It may not be the classic, but it is delicious.

For the broth you will need:
4 ounces dried mushroom blend (preferably one that has shiitakes in it)
2 medium red onions skin on and whole
a fist sized knob of ginger
2 cinnamon sticks
1 tablespoon whole clove
1tablespoon whole coriander
1 tablespoon fennel seed 
3 whole star anise
2 tablespoons fish sauce
2 tablespoons turbinado sugar ( or a half dollar sized hunk of palm sugar, if you can find it)
salt to taste

To finish the soup:
1 package rice noodles, the thinner ones
chopped cilantro
chopped fresh basil
fresh mung bean sprouts
scallions thinly sliced in the bias
crimini mushrooms very thinly sliced
Lime wedges
Sambal Olek

To make broth:

soak dried mushroom blend in 4 cups water overnight in the refrigerator

Preheat oven to 350 degrees
Drain mushrooms reserving the liquid. Pat dry and toss with olive oil and salt. Spread mushrooms out onto a sheet pan lined with parchment and roast in oven for about 15 minutes until golden and even slightly crispy. 
While Mushrooms are roasting cut 2 red onion in half lengthwise and place on another sheet pan lined with parchment. Place whole knobs of ginger on same pan and roast them in the same oven
with the mushrooms. once the onions are caramelized and the ginger is soft, slide the onions into a large stock pot, chop the ginger into big chunks and put it in the pot along with HALF of the roasted mushrooms. Pour in 10 cups of water and bring to a slow simmer. As it's coming to temp, dry roast your spices in a clean dry saute pan and add them to the pot. Add salt and sugar and fish sauce. Let simmer gently for at least 1 1/2-2 hours. Strain broth and keep very hot until ready to serve, checking the spice and adjusting as needed. (or if your doing it ahead chill and store for up to one week)

Bring 6 quarts of water to a boil in a large pot and add rice noodles cook, stirring frequently. boil until just tender then drain and toss with a tablespoon of vegetable oil to keep from sticking together. Set aside until ready to assemble.

To serve:
Put noodles in bottom of bowl. Sprinkle on some of the roasted mushrooms and some of the sliced fresh mushrooms. Ladle hot broth over this and serve at table with the condiments on the side, so people can put on what they like. Serve with a nice refreshing bottle of 'Red Saigon' (over ice, the way they do it down there!) and you'll feel like you've had a little trip to Vietnam, sans the jet lag.